
You bricked your router . . . now what? The first time I updated my router to use OpenWRT I wrote a guide and published it to the OpenWRT Forums so that when I wanted to do it over again, it would be a simple matter of looking up my notes and going through the process. Sounds pretty simple.
Then they updated the firmware. The notes I had written no longer applied and I was sitting there without a router or a plan. The following is my updated guide on what to do the next time I lock myself out of a device.
I ran into trouble by trying to use Fedora to set up the TFTP server and serve files, but SELinux did not like that and was fighting me the whole way. I ended up using a Live Boot of Pop!_OS to complete this task. After booting from a USB, I downloaded Wireshark, the TFTP server, and UFW (Uncomplicated Firewall). I captured network traffic, downloaded firmware, and stood up the TFTP server all from the USB boot.
Overview of Steps
- Connect to the proper Ethernet ports and start recording traffic with Wireshark
- Discover what IP address range your router is trying to reach
- Manually set the IP address of your NIC
- Discover what file the router is trying to pull from the TFTP server
- Install and configure the TFTP server
- Rename firmware to what the router is requesting
- Transfer files and install to the router
- Renew DHCP address and connect normally
Router Reset via TFTP
Router Model TP-Link Archer v7 with OpenWRT.
IP Address Discovery
First, with the router off, connect the Ethernet to switch port 1. Open Wireshark and select the NIC that is attached to the router at switch port 1. While holding in the reset button, power on the router until ARP requests start populating the screen.
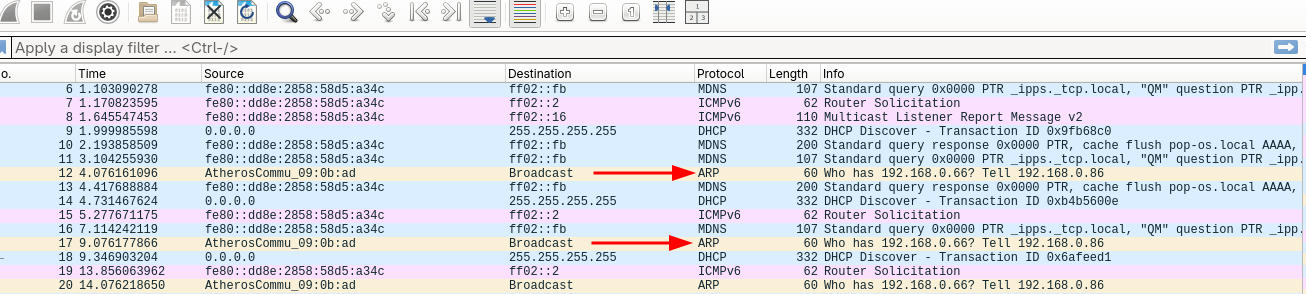
We can see ARP requests being broadcast across the network. Who has 192.168.0.66? Tell 192.168.0.86. This is the router broadcasting to the network looking for 192.168.0.66. Manually set your NIC IP address to 192.168.0.66 to be able to communicate to the router.
sudo ip addr add 192.168.0.66/24 dev <YOUR DEVICE>

sudo ip addr add 192.168.0.66/24 dev enxf8e43bbce345
TFTP Filename Discovery
Power off the router and restart the Wireshark capture. Again hold in the reset button and power on the router, waiting for traffic.

Packet 1 is the ARP Request broadcasting to the entire network looking for which device is 192.168.0.66
Packet 2 is the ARP response from the NIC telling the router, I’m 192.168.0.66!
Now we can see TFTP protocol traffic. There is a Read Request originating from 192.168.0.86 to 192.168.0.66 in Packet 3, 5, and 9. The request is querying our machine for a file named “ArcherC7v5_tp_recovery.bin”
This is what the OpenWRT image must be named in order for the router to pull the firmware via TFTP. This is the “Factory” type image.
Download the “Factory” image and rename the file to “ArcherC7v5_tp_recovery.bin”
Install the TFTP Server
sudo apt install tftpd-hpaConfigure TFTPd directory. Make directory and set permissions.
sudo mkdir -p /var/lib/tftpboot
sudo chown -R nobody:nogroup /var/lib/tftpboot   # or tftp:tftp on some setups
sudo chmod -R 777 /var/lib/tftpboot              # allows read/write (be careful on production)
Configure TFTP server.
sudo nano /etc/default/tftpd-hpa

TFTP_USERNAME="tftp"
TFTP_DIRECTORY="/var/lib/tftpboot"
TFTP_ADDRESS=":69"                  # listens on all interfaces, port 69
TFTP_OPTIONS="--secure --create"    # --create allows uploads from clients
Restart service with new configuration.
sudo systemctl restart tftpd-hpaAllow Port 69/UDP through firewall
sudo ufw allow 69/udpMove Factory binary to TFTPd directory
If your firmware is named anything other than what the router is requesting, it will not be transferred. Rename the file now.
cp ~/Downloads/ArcherC7v5_tp_recovery.bin /var/lib/tftpboot/Begin File Transfer to Router
Power down router, restart Wireshark capture. Hold down the reset button and power router on until transfer traffic is observed (6-10 seconds) If the entire file has been transferred, the last TFTP Data Packet will have (last) noted in the packet info. The firmware will begin installing and the router will reboot when complete (3-5 minutes)

The conversation in this file transfer is as follows:
Router: Who has 192.168.0.66?
NIC: I do, I am 192.168.0.66
Router: Can I have the file ArcherC7v5_tp_recovery.bin?
NIC: Here you go!
The final packet of data should include ‘last’ in the packet info. If it does not, it could be an incomplete file transfer, or there are numerous other reasons such as the size of the file is divided completely evenly between the number of packets that are sent. Without the ‘last’ packet, the router may not realize that the entire file has been transferred.

Remove manual IP address assignment for your NIC and receive DHCP assignment.
sudo ip addr del 192.168.0.66/24 dev enxf8e43bbce345Set Ethernet settings to DHCP. A new IP address will be assigned on the 192.168.1.0/24 network.
Connect to Luci web GUI at 192.168.1.1 and configure router as desired.
Closing Thoughts
How did I come by this project, you ask? Yeah, I tried loading the wrong firmware and locked myself out. Thankfully my router model had the feature to load firmware via TFTP for this reason. Some models do not have this feature and a locked out router may be properly bricked without maybe rewriting the firmware directly onto the flash chip.